The Only Monthly Mac Blog That Matters…

Category: Uncategorized

Keeping Files Organized On Your Desktop

messydesktop1

Are you a digital hoarder? Or are you just extremely unorganized?

You’re hardly alone. Most of us have no idea how to keep things nice and neat on our desktops – mostly we have a random jumble of files, folders and other digital debris. Yet there is a way to keep things neat, or at least not be embarrassed when somebody glances at your screen. Plus, if your desktop is weighted down with tons of files, it can slow your computer down to a crawl!

So what’s the best way to keep your desktop organized?

 Step 1: Use a method that works for you

There is no “one size fits all” solution to desktop organization. Rather than be locked into an organizational philosophy that goes against the grain, design a folder hierarchy that works the way your brain does. That may involve separating work from personal, entertainment from admin, etc. But name (and organize) your folders in a way that is intuitive to you.

 Step 2: Use the folders Apple provides

Inside your home folder, there are a number of folders that are designed for easy access. These folders are placed in your home folder by default and are a great place to start organizing files. It’s extremely simple – you keep your photos in the Pictures folder, your music in the Music folder, etc.  But beyond that, it gets a little more complex.

 Step 3 Create your own folders

Folders can hold an infinite number of files and other folders. So don’t be afraid to put folders within folders within folders, just like the nesting Russian dolls. Create a few folders – and break down the top level to the lowest common denominator. For example, the folders that sit on the desktop could be named:

  • Admin
  • Family
  • Finances
  • Pending Issues
  • Work

Those five folders cover a lot of ground. For example, Family could have subfolders such as Children and School. Pending Issues could hold vacation plans, submitted health claims and current home projects. Same goes for the others – plan on populating those folders with the files (and folders) that best fit within. Good luck and have a great holiday season and an organized New Year!

Continue Reading

Your iPhone: Understanding and Managing iCloud Storage

icloudfull2Recently, three clients, hectored by Apple to buy more “storage for their iPhones,” paid for it, thinking it would increase the capacity on the phone itself.  Sorry to say, this warning has nothing to do with the iPhone’s hardware and everything to do with paying for online storage to back up your iOS device.  As far as priorities are concerned, online storage for your iPhone (or iPad) can be filed under “Nice to have, but surely not necessary.”

Not that Apple is being dishonest – it is just cleaning house and winding down the practice of tons of free storage given to MobileMe subscribers who migrated over to iCloud.  All iCloud subscribers get a complimentary 5GB of storage; nice, but hardly enough space for even the smallest collection of apps, photos and music, considering iPhones are available in sizes up to 64GB, and who knows what amped up capacities Apple has in its pipeline.

Of course, if you’re willing to crack open your wallet, additional online storage is available. As of late 2013, Apple has the following price points in place:

  • 10GB additional (15GB total): $20/year
  • 20GB additional (25GB total): $40/year
  • 50GB additional (55GB total): $100/year

Since many of us have 64GB iPhones, that’s a $100/year expense if you want a full backup of our phone. Certainly that’s not a lot of money, but these little sums add up. Yet there is a way to avoid paying for cloud storage, and that’s by using your Mac to back up your iPhone. Besides the cost advantage, it’s also a quicker process to restore the phone from your computer as opposed to restoring from the cloud.

This is accomplished by plugging your USB sync cable into your computer instead of a standard charger. Launch iTunes and highlight your iPhone in the left sidebar and select “This computer” in the Backups pane of the iTunes window. If you crave immediate gratification, simply click on the “Back Up Now” button, which starts the process. Note that your iPhone will be backed up on your computer; and the computer will be backed up to your external drive or Time Capsule.

Understand there is more to this story – part of this service includes Documents In The Cloud – which is online storage of iWork documents (Pages, Numbers and Keynote). However, I haven’t seen a mass exodus from Microsoft Office to iWork, and haven’t fielded many inquiries about iWork cloud storage.

Some helpful links from Apple:

iCloud Support: Documents in the Cloud

iCloud: Managing Your iCloud Storage


Continue Reading

Working With Microsoft Entourage

entourage

Microsoft Entourage (introduced 2000, discontinued 2010) is Microsoft’s email client and is included in its Office for Mac software suite. Despite being “out of print” for three years this month, it’s still the go-to email program of many Mac users. Although it’s a superior product to Apple’s Mail application, using Entourage has a number of issues that give users trouble, although they’re not all deal breakers.

Here are the drawbacks of using Microsoft Entourage:

•  Having to rebuild your database: Entourage stores all its data in a database file (buried deep within your Documents folder) and it grows larger and larger as more and more messages are received and sent. When the Entourage Database file grows to several gigabytes, it crashes and requires a rebuild. Unfortunately, deleting messages along the way doesn’t reduce its size – only rebuilding will shrink the file. (Actually, it creates a new, smaller database file.)

The biggest problem is that the program is unusable while the database rebuilds, and the larger the database file, the longer the rebuild process takes. A rebuild that lasts eight hours is not unusual. And although the Microsoft’s software people did a great job, the success rate for rebuilds are around 80%. To learn how to rebuild your Entourage database, click here. For the 20% of failed rebuilds, there is hope: sometimes third-party products such as EntourAid can save the day, but generally there are no guarantees.

•  Entourage requires a separate address book: Apple got one thing right – its address book (named Contacts) is used for multiple Apple applications, including Mail, Messages (formerly iChat), FaceTime and of course it serves as the “address book” for iPhones and iPads. Not the case with Microsoft. Entourage requires its own proprietary contact list. There are options for syncing the two – but the two parties don’t always play nicely, and the results often include duplicated entries or cards with the fields not mapped properly. On the bright side, the address book in Entourage is far superior to Apple’s Contacts.

• Entourage has an expiration date: If history serves as an indicator, in the not-too-distant future, Microsoft will discontinue support for it, or more likely before that happens, it will not be compatible with a future Mac OS upgrade. Once this happens, you have a few choices: Stick with Microsoft (and all the issues that dog Entourage) by upgrading to Outlook (the email client in Office 2011, the current release as of this writing), give up fighting the good fight and go with Apple or go radical with Mozilla Thunderbird or some other B-list player.

Continue Reading

A Cautionary Tale – Nobody is Safe From Hard Drive Failure!

hd

As you might’ve heard, the hard drive on my laptop crashed without warning early this month. (OK, maybe a little warning.) Even though I had my data backed up, it took 16 hours to totally restore it all on my hard drive. (I picked up a new laptop to expedite the process.)

The moral of the store? BACK UP YOUR HARD DRIVE! I can not stress it enough. My advice is that you back up locally using a hard drive (or Apple Time Capsule).

Your computer is your address book, photo album, stereo, checkbook and more all rolled into one. Protect your data and backing it up! The best way to protect your data is to have two different backup processes running simultaneously.

As far as backing up goes, there are two ways to protect your information: a local backup (usually a hard drive connected to your computer) and a cloud solution (meaning your stuff is stored on a server located somewhere else). Both have their advantages and disadvantages. When deciding whether to back up locally or to the cloud, it’s best to know the pros and cons of both.

Local backup: The least expensive and most common method. Typically, you connect an external hard drive (USB or FireWire) to your Mac and allow Time Machine (Apple’s backup utility that is built into the Mac OS) to handle the process automatically. And since external hard drives are cheap and easily available, this solution makes sense for everybody.

Requirements:
1. Apple Time Machine software (standard in Mac OS X.5 “Leopard” and later) or a third-party backup software for Macs running OS X.4 “Tiger” or earlier.
2. An external USB or FireWire hard drive, preferably 500GB or larger (available pretty much everywhere).

Pros:
• Extremely easy to configure – a simple plug-and-play connection.
• Hard drives are at an all-time low per gigabyte.
• It backs up your entire computer automatically – a simple set-and-forget process.

Cons:
• Isn’t immune to physical damage (fire, flood, etc.), theft or failure.
• You must physically move the drive between different computers to back up multiple machines.

An alternate method to this scenario is to buy an Apple Time Capsule, a device that is a wireless router and hard drive combo.

Requirements:
1. All Macs backing up to the Time Capsule must be running Mac OS X.5 “Leopard” or later.
2. All Macs must be connected to the local network, either wired or wirelessly.

Pros:
• Time Capsule allows you to back up multiple computers on the network.
• It also functions as a reliable router.
• The USB port on unit permits a printer to be easily shared by all users.

Cons:
• Can be difficult to configure – involves setting it up as a wireless router AND as a backup device.
• It is a much more expensive option than a simple plug-and-play external hard drive.
• Susceptible to the same issues as an external drive (useless if stolen or damaged).
• Requires that you replace your current wireless router.

Cloud backup: Your data is backed up (via the Internet) to an off-site server owned by your cloud hosting company. There are several companies that offer this service, but for the average consumer, the two most popular choices are Carbonite and Mozy. Both require a one-year (or longer) subscription; both have similar pricing and levels of service.

Requirements:
1. You must have broadband (cable or DSL) Internet connectivity.
2. An annual payment.

Pros:
• Protects your data in the event of damage (fire, flood) or theft of both your computer and backup drive.
• You can retrieve your files from anywhere in the world you have an Internet connection.

Cons:
• Requires a paid subscription plan.
• Cloud backup services are sometimes a bit difficult to set up.
• Restoration is often slow and clunky when accessing files.

But the question is: Should you perform local backup or cloud backup? The answer is “Yes.” The optimal solution is to back up to a local drive, but also subscribe to a cloud service for extra protection.

Continue Reading

RAM – How Much is Enough?

ram1

Is your Mac acting sluggish? Does it bonk during processor intensive tasks? If so, maybe it’s time to install an additional RAM chip or two.

RAM (Random Access Memory) is memory for your computer – but a different beast than hard drive space. The more RAM you have, the more memory-intensive tasks you can do on your computer. What confuses people is that both hard drives and RAM are measured in GigaBytes (GB).

Apple has been historically stingy when it comes to the amount of installed RAM when buying a Mac off-the-rack (although they’ve been less Scrooge-like in the past few years). But for those working with programs that are RAM hogs (mainly graphic artists, photographers and audio/video power users), an immediate upgrade is often mandatory.

To find out how much RAM you have, pull down on the apple in the upper left corner of the screen and select the top choice, About This Mac. This window will tell you what processor your machine has, how much memory is installed and the name of your startup disk. (Which is only useful for machines with multiple drives and/or partitions.)

By clicking the More Info button in the About This Mac window, you’ll be able to see additional information about your computer. Click on the Memory tab in the left column, and you’ll be able to see the details of your installed RAM.

ImageUnless you’re running Mac OS X.8 (Mountain Lion), where you click on the Memory tab on the top of the window to see this:

ImageTo find out how much memory your computer is able to handle, go to a site dedicated to the specs of all Mac models. My personal favorite is LowEndMac.com, which, despite its name, has accurate information on every Mac, from current machines as well every model going back to 1984.


Continue Reading

Running Out Of Space

startupfull-border

Do you ever think about how much space your data is taking up on your hard drive? Probably not. But when the dreaded “Your startup disk is almost full” message appears on your desktop, will you know what to do?

Your startup disk is almost full.

Wow. Scary stuff. First comes the shock that something as serious as this could happen. Then comes the rationalization: “How could this happen to MY computer? I thought I bought the largest hard drive available!”

And yes, it is a serious issue that has to be addressed ASAP. Things will stop functioning normally if you do nothing, so if you ever see this message, you’ll have to take action. Right away.

The first thing to do is not panic. Close and save all your open applications and then empty the trash (located under the Finder menu in the upper left corner of the screen, directly to the right of the apple). Then “get info” on your hard drive (by clicking on the hard drive icon on your desktop ONCE and hitting COMMAND-I on your keyboard). The window that pops up will indicate how much data is on your hard drive and how much unused space is available. If emptying the trash doesn’t give you at least 5GB of free space, do the following:

Eliminate any space-hogging files in your Downloads folder. Located within your home folder, this is the default location where your downloaded files are stored (unless you changed the preferences). By looking in this folder, you can eliminate any document you don’t need and any .dmg files you have downloaded, such as Adobe Flash Player, Google Earth and Firefox, among others. Drag these into the trash and empty it, then repeat the “get info” process. Again, look to have 5GB of free space.

Once you get past the Downloads folder, things get a bit harder to tidy up. By understanding that in most cases, the offending file types are movies, music or large graphics files, you’ll know where to look. Your media files are found in iTunes – if you want to weed out your music, movie or TV shows within iTunes, you can simply highlight the song or movie you want to lose and hit the DELETE key. You’ll get a warning dialog box; click “move to trash” and then empty your trash as described above.

If you want to eliminate any type of file from your hard drive but retain a copy of it, you will have to offload them onto an external hard drive or burn them onto a DVD. If this seems as scary as installing a stereo in your brand new SUV, then it’s time to call in a professional to help with this problem.

Continue Reading

Wireless Security

wirelessrouter

Do you know exactly how secure your wireless network is?

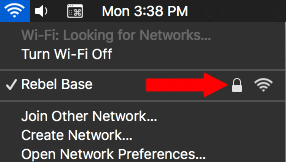
If you don’t, you’re certainly not alone. To see if your wireless network (or WAN) is secure, simply pull down on the pizza slice-shaped icon in the upper right corner of the screen. If there’s a lock icon to the right of the wireless network name, congratulations, you have a secure wireless network! (Note – you must be running Mac OS X.5 – Leopard – in order to check your network security this way.)

But if there is no lock, it means your wireless network is wide open, and anybody who is within range can piggyback on your network. And that can mean all sorts of trouble for you.

You should never allow unauthorized users to be able to access your wireless network, for many reasons, including:

• Security of your data: Anybody who is savvy enough to glom on to your network probably can figure out how to get to your data. It’s easy enough to imagine the bad things that could happen if your personal and professional data was compromised.

• Speed of your network: Even if the kid next door is doing no more harm than simply using your network to stream movies or download entire Dave Matthews Band concerts, all that traffic will slow your online speed down to a crawl. That means your download speed will be diminished, something you certainly don’t want.

• Legal reasons: If somebody is using your wireless network to download copyrighted or illegal material, or uses your IP address to post defamatory and/or threatening posts online, whose door do you think the authorities will knock on first?

Adding security to your wireless router is simple – how you do it depends on what brand you have. To configure using an Apple wireless product (AirPort Extreme, Express or Time Capsule), you will need to use AirPort Utility (included on every Mac, found in the UTILITIES folder (which is inside the APPLICATIONS folder).

Virtually every other brand of router is configured using a standard Web browser – Safari, Firefox or Google Chrome. You must enter the IP address of the router (which can be found in SYSTEM PREFERENCES>NETWORK) in the URL bar of your browser. Every model is different, but if you look for “Settings” or “Wireless,” you’ll be on the right track.

Click here for my piece on wireless security, rated “Great Answer” from AnswerBag.com.

Continue Reading

About Bookmarks

bookmark

Browser bookmarks (also known as “Favorites”) are a way to save (and to quickly launch) oft-referenced websites. It’s a great time-saver and no matter what browser you use (Safari, Firefox, Google Chrome, Opera or one of the more obscure ones), dealing with your bookmarks is a simple task. But – like a lot of things in life, if you don’t actively manage them, things can get out of control very quickly.

The biggest problem with bookmarks is the overabundance of them paired with the lack of organization. Take Firefox, for example. By adding a bookmark (Command-D), it drops your latest addition to the bottom of the list – and depending on how many you’ve previously added, it could be harder to find than Jimmy Hoffa.

To keep your bookmarks list tidy, you must delete and/or organize them once in a while. Every major browser makes it easy to lose your unwanted bookmarks; also, there are ways to organize them to shorten the list and to keep similar ones together. The best way to keep your bookmark list spiffy is to create folders within your list.

Adding a bookmark is the same in all the major browsers – for example, Command-D adds a bookmark in every one of the big four (Safari, Firefox, Google Chrome and Opera). However, adding a folder is a slightly different process, depending on your browser.

To be able to see (and edit) your bookmarks, pull down on your browser’s BOOKMARK menu:

• In Safari: “Show All Bookmarks”

• In Firefox: “Show All Bookmarks”

• In Chrome: “Bookmark Manager”

• In Opera: “Manage Bookmarks”

Once you’re able to see all your bookmarks, you can now create folders to help organize your bookmarks:

• In Safari: Click on “Bookmarks Bar” (in left sidebar) and then click the plus (+) icon at the bottom f the bookmark list

• In Firefox: Pull down on “gear” icon and select “New Folder”

• In Chrome: Pull down the “Organize” tab and select “Add Folder…”

• In Opera: Click on the “Add” tab and select “New Folder…”

To delete bookmarks:

In all browsers, simply highlight the bookmark you want to eliminate and hit the “Delete” key on your keyboard.

Continue Reading

The Future Of Software

4rent

For the end user, obtaining software was traditionally an easy process – they either bought (or “borrowed”) the program they needed to work with, inserted the disc into the computer and copied the software onto their hard drive. But today, with software giants Adobe and Microsoft guarding against piracy with Fort Knox-like effectiveness, many users simply have trouble swallowing the bill ($1899 for Adobe CS6 Design & Web Premium) for the privilege of having a “legit” copy of the software suite on their computer.

Consider this: A recent call to Adobe to inquire about “volume discounts” yielded no savings on licensing CS6 for twenty five users, but I was hectored by the sales rep (multiple times!) to consider Adobe’s “Creative Cloud” rental service ($49.99/month). Similarly, Microsoft recently released its $99/year “Office 365” suite for both Windows and Mac (more on this later). Plus, the latest incarnations of the iMac and MacBook Pro do not even include a built-in disc drive, so it looks like software on physical media is traveling the same road as the floppy disk.

My call last month to Adobe was interesting to say the least. Here, my intrepid sales rep pointed out a number of reasons NOT to buy the traditional Adobe Creative Suite in favor of Creative Cloud. Trust me – I once sat in a cube and sold computer stuff over the phone and know for a fact this guy was simply parroting the corporate mandate, not opining on his thoughts about buying vs. renting. And I’m sure there was a bonus in it for him for how many sales he “converted.” Oh, that darn Kool Aid…

That brings us to Office 365, Microsoft’s “Software as a Service” offering. (They really seem to hate the “rental” tag.) Like Adobe, there are a dizzying number of different versions available, but since you’re reading this, the “Home Premium” option should suffice. This will allow you to install the latest version of Office for Mac (2011) on up to five devices. Just as with the traditional Office for Mac, Microsoft will issue periodic updates.

Bottom line: The “rental” scenario is probably a good deal for most people. I work with a few starving graphic artists, and signing up for the Creative Cloud for under fifty bucks a month is an easier pill for them to swallow than plunking down over a grand in one shot. Same with Office, although the list price is far more affordable for the “Home & Business” version, which goes for a semi-reasonable $219.99 (at Best Buy, last time I checked).

Full disclosure: I haven’t tested either package, but plan on installing Office 365 on my laptop this month, because if it’s all what Microsoft claims it is, there should be scores of users ready to install this rather than spend a couple hundred bucks on buying the traditional media. Stay tuned.

Continue Reading