January 5, 2023
Does Your Crystal Ball Tell You That It’s Time For a New Computer?

All good things must end – and the useful life of your computer is one of them. But when should you look to upgrade, and just as importantly, how will you know?
The fact: Needless to say, Apple doesn’t continue support on its products indefinitely. (Otherwise, irate users would be hauling SE/30s into the Genius Bar.) In short, Apple gives it seven years. This includes Macs, iPhones, iPads, and Apple TV. Once your product has passed its seven-year cycle has been reached, Apple no longer wants to know about it.
First of all, understand that many users are out there working fine with computers that are ten (or more) years old. Just because your Mac is approaching seven, it doesn’t mean that there’s some kind of Logan’s Run scenario happening where somebody (or something) is out to destroy computers when they reach a certain age. If you’re using an older computer and have no complaints, then carry on (and back up your Mac!)
Now, that might not be an issue if things are working fine, but what if they’re not? And Apple’s suggestions to help aren’t always the best advice (or the advice I would give): Simply updating the operating system is one of the stock answers at Apple, and although it can have some benefits, it’s a dangerous road to travel, as the geniuses there don’t always explain the potential risks of doing that. Some of which are outlined in my “The Hidden Costs of Buying a New Computer,” blog, available here.
What are the signs of old age that aren’t reversable?
Slowness: Like people, some computers get slow before they get too old, but usually that can be remedied. However, in some instances (and I can’t figure out what the users are doing, if they’re doing anything wrong at all), sometimes computers get slow and draggy and the spinning beachball of doom is a constant reminder that the computer is getting long in the tooth.
Inability to connect to certain websites: Old computers have old operating systems, and those old operating systems are only compatible with an older versions of web browsers. And because security protocols are constantly being updated for secure sites (banks, etc.), new versions of the software are constantly introduced. But backwards compatibility can be a bear, and, to keep it simple, newer versions of software don’t work on old versions of the operating system. And upgrading the operating system isn’t always possible with older hardware. So, it’s a Catch-22; you can’t upgrade your browser without updating your operating system, and you can’t update your operating system because your hardware is too old. Are you getting all this?
Inability to use new versions of software: Rather than repeat myself, it’s the same deal as the above paragraph. Suppose you’re a QuickBooks user, and you need to upgrade your version of QuickBooks, because that’s the version your company is using. Same answer as above, it might need a certain OS which requires newer hardware than you have.
Running out of storage: I know storage issues confuse people – iPhone storage, RAM, iCloud storage, hard drive storage all are terms bandied about, but here it’s internal storage (formerly known as “hard drive storage”). These days, computers no longer have internal hard drives with spinning platters and all that fun stuff, but instead, a solid-state chip. Which, at this stage in the game, are more expensive than standard hard drives, ergo, tend to have a smaller capacity. Though this is changing…
Of course, there are age-related (or damage related) issues that can factor in; hardware damage, dead pixels on the screen, broken keys on laptops, non-functioning ports and screen flickering, all issues that are, to be frank, not worth pouring money into getting them fixed.
December 10, 2022
Dealing With The Glut of Junk Email

Unless you (or someone you love) has been affected by the water in Camp Lejeune, have a package (you don’t know about) that requires you track it, or you’re deficient in other areas, you really don’t have any need for junk mail. Besides, most, if not all of them, are not legitimate, so there’s no reason to believe there’s a kernel of truth in any of them. It seems once that the “junk” senders get ahold of your email address, it’s all over. Hearing aid offers, Yeti coolers, and donations pleas for political candidates running in other parts of the nation clog up your inbox.
All the time, people complain to me about the “junk” email they receive from CVS, Lands Ends, and Facebook.
OK, let’s get this straight for once and for all. JUNK email is unsoclicated messages you receive from senders who you’ve never dealt with – the Nigerian Prince requests, casino stuff, or financial institutions you’re not a client of. The messages from Netflix, Whole Foods and LinkedIn are NOT junk mail – they’re all companies with whom you “opted-in” – meaning you allowed them to send you emails.
And these companies are holding up their end of the bargain – you requested emails from them, and they’re delivering them. Maybe too many for your taste, but you DID subscribe to them at one point, right? SO – you can easily unsubscribe from these senders. Yes, it takes time to click on each one, but you did take the time to allow them to send you messages. In some instances, you can limit the number/types of email messages you receive from them when you click on the UNSUBSCRIBE button at the bottom of the email.
On the other hand, total junk email doesn’t come from legitimate companies – mostly from people who are trying to get hold of your hard-earned money, or perhaps a password or two. These are harder to get rid of, but to be honest, a good company (Google, Apple, or Microsoft) can filter that mess out of your inbox and dump it straight into your junk mailbox. Best way to handle – make a few targeted “rules” (see below) and ignore them.
And then, right in the middle, are the political emails. (Side note: If you ever read the drama queen-quality of these emails, you’ll think the world will end if you don’t donate!) Now, from a job I held many light years ago, I DO know that mailing lists (both hard copy and email) are bought and sold like penny stocks, and there are entire companies dedicated to the acquisition and sales of email lists, with not-for-profits and political lists being extremely popular options. So, if you subscribe to one of these lists, or worse yet, donate money, your data is being sold to other like-minded lists, a web you’ll never extract yourself from. These people are NOT your friends – they’re using your email address to make money for themselves. Be careful who you give your email address to.
November 8, 2022
About Apple Pay & Apple Cash
In case you’re still living like it’s 1988, you might not realize that all of the big tech firms out there (Apple, Google, Amazon, etc.) want to be your bank. (They also want to be your doctor, your password vault, storage repository for your data – among other things – but that’s a story for another time.) Like those “one to one” marketing firms that failed spectacularly during the dot com bubble around the turn of the last century, the idea is to lock the customer (you) into your tech company of choice.
Although Google and Facebook got cold feet (whether due to regulations, increasing inflation, or whether users don’t want a company whose privacy knows no bounds sticking its nose into their finances), there are plenty of other Silicon Valley companies that want to deal with your fiscal matters. Like Apple, for example. (And the Kardashians tried as well more than a decade ago, but that idea got shot down in about 3.5 minutes…)
But back to Apple. One question that is often asked – what exactly is Apple’s service called? Simply put, there are two, which are intertwined: Apple Pay and Apple Cash.
OK, first things first. Let’s start with Apple Pay. According to its site, Apple Pay is “is a mobile payment service by Apple Inc. that allows users to make payments in person, in iOS apps, and on the web. It is supported on these Apple devices: iPhone, Apple Watch, iPad, and Mac. It digitizes and can replace a credit or debit card chip and PIN transactions at a contactless-capable point-of-sale terminal.”
Translation – it’s a way to store your credit card in your Apple device (Mac, iPhone, iPad, Watch) in order to make payment easier at establishments that accept it. And it’s a contact-less type of thing – you can shop at Whole Foods and not have to touch that germ festooned keypad – unless you use a debit card as your default card and have to key in your PIN. (But you DO keep hand sanitizer in your car, correct?) So that’s Apple Pay – a way of using your Apple device to store your credit card, instead of an old-school wallet that you pull out of your back pocket.
Now, Apple Cash. Again, built into your iPhone, it’s “an easy way to send and receive money” according to Apple website. The balance is stored in a digital card inside your iPhone Wallet, and like I’ve mentioned, you can use this cash in stores, online, and within apps, as it’s connected to Apple Pay. You can send and/or receive money via Messages or Wallet. (Really, it’s Apple’s version of Venmo.) Plus, you can set up your kids with their own Apple Cash cards.
So, there you have it. If you’re comfortable with allowing big tech to get its claws deeper into your finances, then go for it. If not, that’s perfectly understandable too. There’s no shame in not signing up for this. Me, I try to keep my fiscal matters away from big tech, but it’s a necessary evil in my world, as I offer all the big payment types to clients; Venmo, Zelle, Apple Cash, PayPal, Credit Cards and even Bitcoin (if you’re not scared of it’s horrible performance over the past year or so.)
October 7, 2022
How to get Started With a New Email Address

OK, so last month we discussed using email providers that aren’t up to 2022 standards, and potentially switching to one that is equipped to meet the demands of today’s users. So, if you have gone ahead and gotten yourself a new email account, congratulations. But that’s only the first step of the journey. What to do next?
First of all, do NOT cancel the old account. (You certainly don’t want any emails returned as “undeliverable.”) You have a myriad of things to concern yourself with – including your peeps who only know your “old” email address, any accounts the old address is connected with, and the contacts that are associated with that account as well.
Number one, you want to let the world know you have a new email account. You can tell everybody that you have a new account, they’ll say “great” and continue to use your old account. So – you’ll have to let them know you have a new address.
You can send an email blast to everybody in your Contacts (a.k.a. address book), but that’s not enough. The best thing to do here is to enable a “vacation message” in your old account – an automated reply that people use to indicate they’re not available to respond to your message. But instead of telling people that you’re on a fabulous vacation with all the beautiful people, inform them that you’re using a new email address. And put in a date that you’re going to terminate that account. Such as:
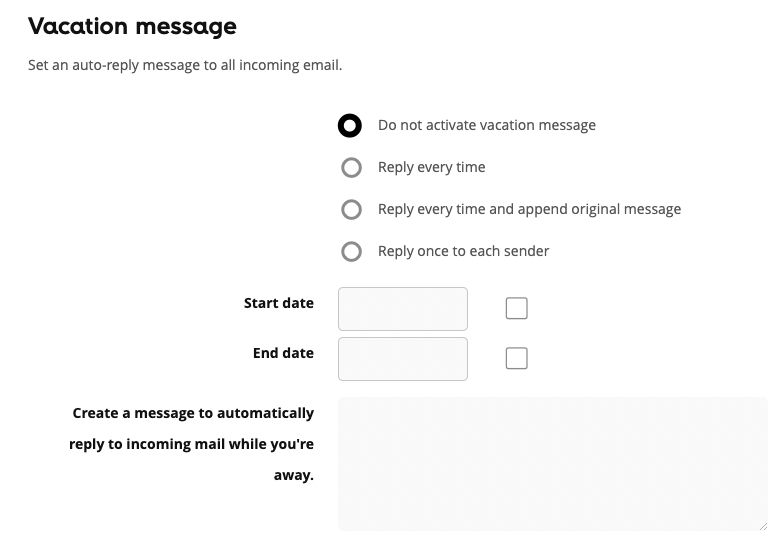
“Effective immediately, I can now be reached at newemail@gmail.com. I will no longer be using my nolonger@aol.com email address, and that account will be closed on 12/31/22. Please change it in your contact list. Thank you!”
The second step is to do an login change for all accounts you use your old email address to log into – sites like Facebook, Amazon, etc. That necessitates that you log into EVERY one of those accounts (one at a time). Yes, a pain, but vitally important if you plan on jettisoning your old email address.
The third step is to change the communications preferences of all your accounts that use the old address. The login name might not be the same as your email, but the way you receive information from them is your old email address. Similar to changing the logins in the previous step, you’ll have to do this one account at a time. Best practice; monitor the inbox of your old account, and every time an email comes, change the communications preferences. On the bright side, if you’re getting a lot of garbage emails (stores that overload your inbox, political hacks begging for money, etc.), simply don’t notify those senders that you’ve gotten a new email address. Let those emails bounce once you’ve closed your old account

Finally, migrating your contacts over to the new account. You might be using iCloud for your contacts, and since you’re not changing that account, it might be a moot point. But if your contacts are linked with your AOL account, then you’ll want to migrate those over to your new account. You’ll also want those contacts to be able to sync to your iPhone and other devices as well. But I’ll handle that process next month. Same Mac time, same Mac channel.
September 6, 2022
Are You Using Yesterday’s Email Provider Today?

Of course, you have an email account. (Or perhaps more than one.) And, you’ve probably had it for years and years and have used it as your login for many sites. But have you thought about your email domain lately? (The domain – or suffix – of any email address is the portion after the “@” symbol.) It could be one of the standard ones – for a lot of you, that’s gmail.com. Or optonline.net. But there are others that have been around for years – things like snet.net, yahoo.com, att.com, and even most people’s gateway email address. Aol.com, still has an impressively large, if not entirely older, user base.
However, note that the domain USUALLY indicates the company that hosts your email. If it’s a custom domain (like the one you received this email from – chriscapelle.com), it’s still hosted by somebody. (In my case, it’s 1and1.com, but that may change.)
Now understand that most email domains work very similarly – you establish an address, you configure your email client (Apple’s Mail or Microsoft’s Outlook in most instances) or use a web interface to view, send, and receive your email. All without thinking too much about your email domain.
But what if you suddenly discovered that all email providers weren’t created equal? That some are better (perhaps far better) than others? That some simply have fallen behind the times and can no longer compete with the big players? Is your email address with one of the good companies? And how do you know which providers are any good?
I’ll be honest here – I’ve been doing this for many years and have pretty much figured out what’s good and what’s… not so good.
Let’s take att.net, snet.net, Verizon.net and yahoo.com. They’re all part of one big company – AT&T took over SNET, and they were both acquired by Yahoo (I think – maybe I have the timeline wrong) and SNET (Southern New England Telephone), a company that has its past tainted due breakup of the Bell System, which itself was intertwined with AT&T, all of which is recorded in moldy textbooks studied by MBA students. In short- it’s not in the business of providing quality email – Yahoo is search/content/advertising company and AT&T is a horribly expensive mobile phone company (check your bill every month, kids!) and TV service provider. To them, email is an afterthought.
But none of that storied history matters in 2022. The company is a loser. A horrible choice to host your email. Customer service is non-existent and if you’re unfortunate enough to have one of the legacy addresses (such as SNET.net), you’re in peril if you ever lose your password or want to recover your account after getting hacked. Good luck trying to get back to normal if that happens.
So – if you’re using one of the third-tier domains I just mentioned, or one of the (less evil but far from perfect) second-tier domains (AOL.com, Hotmail.com or optonline.net), you might want to consider migrating to a more sophisticated provider, such as Apple (icloud.com or me.com), Google (gmail.com), Proton Mail (protonmail.com), all of which outclass the others listed above.
August 5, 2022
Know When To Update, Know When To Hold Off, Know When To Walk Away, Know When To Run…
Now or later?
One of the most common things I hear from clients is “I don’t know what to update!”
Yes, indeed – we’re all hectored by Apple (and other companies to install the latest and greatest updates. If you own a Mac, it’s a pretty simple process (at least in theory). Updates for the Apple OS (operating system) are supplied by Apple. Similarly, updates for other software generally come from the manufacturer of that package. Ergo, an update for Microsoft Office comes from Microsoft, Photoshop from Adobe, Norton updates come from Symantec, etc.
Except for printers, as Apple now handles most of those updates as part of its OS updates through the App Store. Oh, and speaking of The App Store, apps bought through there have their updates supplied by Apple, even though most are third-party apps…
OK, so it’s not quite as easy as it should be. And furthermore, how do you tell which update prompts are legit and which ones are scams? Read on!
OK, updates (for the most part) fall under one of the following categories:
- Mac OS
- Apps from The App Store
- Microsoft Office
- Adobe Creative Suite
- Adobe Reader
- Firefox
- Google Chrome
- Intuit (Quicken & QuickBooks)
- Norton Utilities
- Other stuff*
*There are CAD and design programs, high-end camera and imaging stuff as well as other specialized software packages, each of which has its own upgrades. If you’re using any software that falls under that category, you can check with the developer about upgrades.
This is by no means a complete list, but it does cover most of the upgrades that average users would encounter.
How to check for updates:
• Mac OS Updates and Apps purchased through The App Store: Pull down on the apple (upper left corner of the screen and select APP STORE
• Microsoft Office: Pull down on HELP menu and select CHECK FOR UPDATES (Works with recent versions; versions before 2011 are no longer supported by Microsoft and no new updates are issued)
• Adobe Reader: Pull down on HELP menu and select CHECK FOR UPDATES
• Firefox: Pull down on the FIREFOX menu and select ABOUT FIREFOX (updates, if required, will be downloaded automatically) – click on RESTART FIREFOX TO UPDATE
• Google Chrome: Pull down on the CHROME menu and select ABOUT GOOGLE CHROME – enable SET UP AUTOMATIC UPDATES FOR ALL USERS (a one-time process)
• Quicken/QuickBooks: Pull down on the QUICKEN (or QUICKBOOKS) menu and select CHECK FOR UPDATES
• Norton: Pull down on the NORTON icon in menu (located to the left of the menu clock)
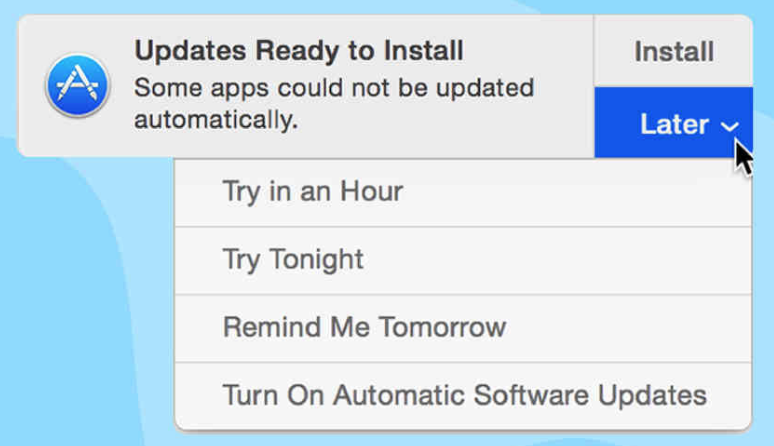
Avoid scams: Never click a link from an email or (especially) a web browser pop-up alerting you to upgrade any software. Anything that requires an upgrade can be performed from directly within the application!
Bottom line: You have to employ an “a la carte” approach to keep the software and operating system on your computer up to date – there is no “one process updates all” option available. In most instances, you do not need to apply an update the minute it’s available (although Flash Player is starting to claim it’s “out of date” when it’s only one revision old!), but it’s a good idea to check your software once in a while.
June 30, 2022
Knowing When It’s Time To Say Goodbye
Yes, parting IS sweet sorrow (to paraphrase old Billy), but then again, we shouldn’t grow too attached to inanimate objects – like computers. Yes, I understand (more than most mere mortals) the importance they have to your life and/or work, but remember, computers like cars, are a depreciating asset. After a while, old computers, even when they’re serviced, work on a “this is as good as it gets” type of thing. So, if you want to have good working computers, you’ll have to upgrade your hardware every few years.
What I’ve noticed: That a lot of these “recent” Macs (say circa 2015) are simply not working as well as they used to be. In some instances, it’s because of the newer Apple OS could be overwhelming the hardware. (There are all sorts of theories out there about Apple intentionally slowing down older models with its updates.) Apple gives seven years as the workable lifespan for Macs; laptops (MacBook, MacBook Pro and MacBook Air models tend to have a harder life, and don’t typically last as long as their desktop counterparts.)
Another issue that rears its ugly head; newer versions of software (and operating systems) start to be flaky (or end up not working at all) on older Macs. Sure, you can hold off for as long as you can, despite Apple’s hectoring you to upgrade), but there are often issues. You might get stuck trying to log onto secure sites (banks, etc.) with older computers that run legacy versions of browsers (Safari, Firefox, Google Chrome, etc.) and other dopey things might not work anymore.
And, yet another problem with that generation of Macs; Apple no longer lets users (easily) upgrade components, so the days of swapping out a hard drive for an SSD or upgrading RAM are all a pleasant memory. That said, I see plenty of circa 2007 iMacs and MacBooks out there, working fine. Maybe not for high-stress tasks, but for normal day-to-day stuff, like word processing and email. At least you can use that old computer as a “station car.” One more advantage of older computers – you can save a few bucks by not having to subscribe to Office 365 or Adobe Creative Cloud on those old timers.
May 23, 2022
Storing and Organizing Your Digital Photos! Part 2
OK, so now that. You’ve digested last month’s intro to Photos and how to create multiple libraries, here is the follow-up!
You’ve created a few different Photos libraries, each with its own theme or sense of purpose. There one with the old family photos you’ve scanned, one from a certain era in your life, another strictly for vacations and finally, one with all your current photos in it. But now that you’ve done all that, what is the “real” library? Which one, if any, backs up to iCloud?
First things first, however. Apple is constantly hectoring you to enable iCloud, so your photos are backed up on the cloud. Not a bad idea but doing that comes with some baggage. If you have multiple (meaning more than one) Photos Libraries, you’ll have to designate one as your “System Photo Library,” which means that’s the one that’s backed up to iCloud (if you choose to walk that road) and its the “dominant” one.
To dictate which Photos Library is your System Photo Library, launch Photos, and pull down on the PHOTOS menu (upper left corner of the screen) and select PREFERENCES. Click on the GENERAL tab and once there, you can decide which of your Photos Libraries will be the System Photo Library. That will be the one the one that syncs to iCloud (if you choose to) and those will be the same photos that you see on your iPhone (again if you choose to do that). Me, I don’t sync my iPhone photos to iCloud – I don’t feel the need to have thousands of pictures in my pocket at any time.
So – what happens to your other Photos Libraries?
By now you’ve figured that ONLY the System Photo Library is backing up to iCloud. So, if your computer dies, and you log on to iCloud with a new computer, only those photos will be recovered via iCloud. So, you’ll have to be proactive and do some work on making sure the others are taken are of.
The remaining Photos Libraries will have to be backed up manually, either using Time Machine, copying them directly to a hard drive, or even using a service such as Carbonite. The good news that most of these types of Photos Libraries don’t change, so it’s not a constant backing up process. I recommend a combination of backups, both a “drag and drop,” along with a Time Machine and a commercial service if you wish. The issue of trying to recover a large Photos Library from Carbonite is like trying to fill a swimming pool with a garden hose. It will eventually do it; it’ll just take forever.
April 26, 2022
Storing and Organizing Your Digital Photos! Part 1

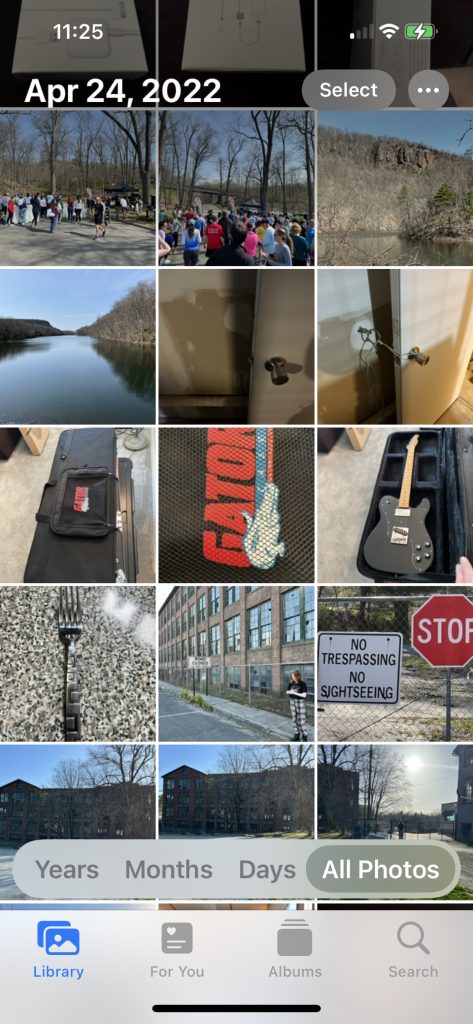
Yes, the days of buying actual film for your camera, snapping some pictures, and sending the roll to Mystic Color Labs (and eagerly awaiting the end result’s arrival in the mail) are long history. Today, it’s easy to take lots of pictures without the burden of the associated costs of the past. Want proof? Since January 1, 2018, I have taken 8233 photos and 340 videos. Would I have taken even 800 pictures in 1988? Doubtful. Highly doubtful.
Of course, I’m sure I could go back and delete the similar pictures and ones that are no longer valid, and I actually do that every once in a while, when I’m sitting at my desk waiting on hold with the insurance company. However, I’m pretty good at keeping my pictures organized – I have four different Photos libraries. The one containing 8000+ pictures IS my “current” Photos library; others include scanned photos from my past and one with my tickets and events.
First things first – let’s get some terminology straight. PHOTOS is the name of Apple’s software that stores your digital photos. (A previous incarnation was called “iPhoto,” a product that is no longer supported by Apple and no longer works on recent OS versions.) A LIBRARY is a collection of photos, and within a library, you can have albums, which are ways to group pictures. A typical album name would be something like “Italy Vacation 2022” or a name that makes sense to you. In that album, you would only put pictures that meet those requirements.
Now, you can put any number of pictures into a library – but the bigger question that begs to be asked; “Do you really want to put all your pictures into one library?”
Maybe you do, maybe you don’t. So, the best way to handle things is to plan in advance how you want to organize your photos. If you want all your “legacy” pictures in one album and all your “current” pictures in another album, that’s cool. It’s all about how YOU want your digital media organized.
So, if you want to start an additional Photos library, do the following: Launch Photos while holding down the OPTION key. You’ll see a window appear that will ask you if you want to create a new library, open one that’s listed there, or choose another one that’s in a different folder on the computer.
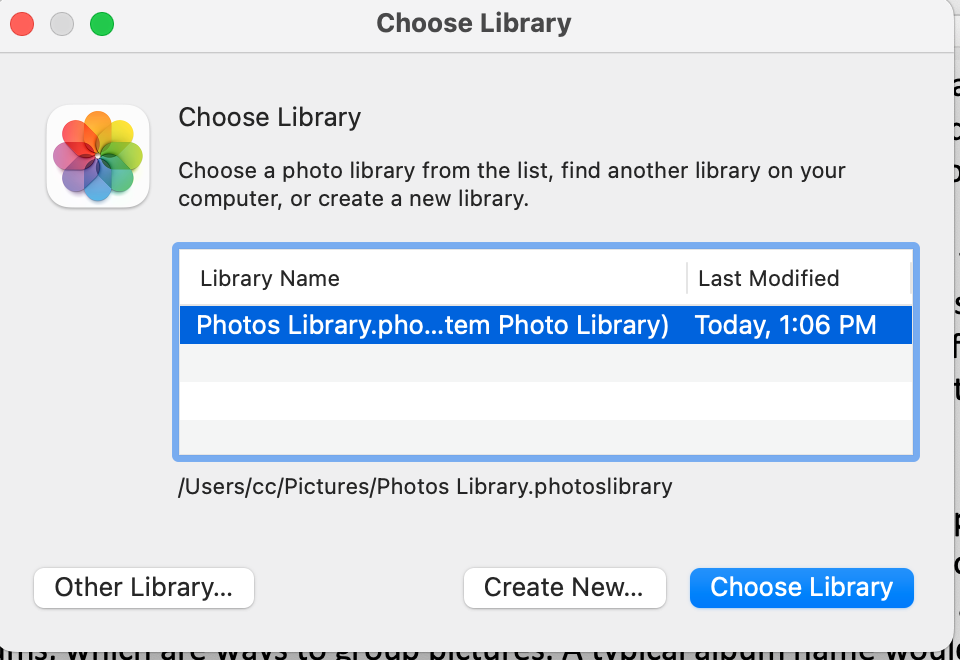
Pro Tip: Name your Photos library with a name that makes sense to you.
Photos, by default, will launch the last-opened Photos library, and will continue to do so until you tell it otherwise. To select another library, launch Photos with the OPTION key held down, as described above.
Remember – you are 100% in charge of what photos you include in your Photos library. Your computer doesn’t know which pictures are important to you – only you do – so you have to tell your computer which ones are going to be included. Saying something like “I want some of my pictures, but not the really old ones!” doesn’t mean anything to a computer. Decide which pictures you want in which album and show your Mac who’s the boss.
Next month: More Photos stuff, this time we’ll talk about backing up and iCloud!
March 21, 2022
Time For Some Spring Cleaning!
Yes, even your computer needs some spring cleaning! But where to begin?
Like real-world spring cleaning, sometimes it’s an overwhelming task that doesn’t have any clear entry point. Simply looking at hard disk space, email, photos, bookmarks, cookies, and cache, etc. makes it easy to put it off. Yet, there are some physical limitations that may be compromised if you don’t a little time to handle this task now.
So – I’ve found the easiest way to handle this non-fun task is to break it up into smaller chunks, and handle one thing at a time. Of course, once you finish, making the effort to do it more often will make it more palatable and less of a task.
First of all, the best way to start is reclaim space on your hard drive (a.k.a internal storage). The places to clean out are all inside your HOME folder:
• Documents Folder: This is a place where, well, your documents are stored. A lot of old documents may be in there. A big space hog is the MICROSOFT USER DATA folder. If you haven’t kept up with things, this folder may be huge. BUT – don’t throw out the entire folder! You’ll want to throw out the Office 2008 Identities and Office 2011 Identities (or even the Office 2004 Identities folder if you’ve been slacking) ONLY if you’re using Office 365.
• Downloads Folder: This is the repository of stuff you’ve downloaded. Usually, it contains photos sent to you and statements from banks and credit cards. But – it also contains the installers you’ve downloaded when you’ve put new programs or apps on your Mac – Google Chrome and Zoom, among others. You can toss out the installers – the software is already on your computer. And delete any pictures and/or statements you don’t want to save.
• Pictures Folders: If you’re now using PHOTOS, you may have a derelict iPhoto library languishing in your pictures folder. IF you’ve updated to Photos, that iPhoto library is only taking up space. Plus, there may be some scans that have saved to that folder. You can weed through those and delete what is no longer relevant.
• Library Folder: This is going where angels fear to tread. The Library folder is a hidden folder for a reason. Mess with the wrong directory and it’s big trouble. BUT – if you dare, there are a couple of places to check out. First of all, the CACHES folder. You can toss everything in there (but NOT the folder itself) – and quite often that helps speed up the computer. Also, in the APPLICATION SUPPORT folder, there’s MOBILE SYNC. That folder contains backups of iPhones and iPad that have been backed up to that computer. Unfortunately, they’re not listed by name (only by a series of random numbers), so you can’t see “which” devices are backed up there, but by the “date modified,” you can make an accurate assertion of whether it’s a current device or one that’s long gone.
And, of course, don’t forget to empty the trash (pull down FINDER menu and select EMPTY TRASH) after you’ve done all this.
As far as email goes, check out my blog post on that subject HERE.