February 1, 2024
The Correct Way To Web Surf…
Is this something you do?

You want to go to one of your oft-visited websites, say Amazon, Facebook, or your bank. So, you launch your browser of choice (according to workawesome.com, and yours truly, it’s most likely Google), and in the search field in the middle of the page, you type in “Amazon.” Then the next page loads, and you click on the top link, and all is good, right?
Not really.
That’s the WRONG way to do that, for a couple of reasons. And the question that begs to be asked; what exactly ARE these reasons?
Well, first of all, for a guy like me who’s into not wasting effort, you’re taking two steps where one will do the trick. Think about it – you have a desired destination on the web, you’re doing a search for the site, and then you’re clicking on the link itself. Not too much trouble in the broad scope of things, but the bad guys know this trick and often float to the top of the search engines with sites that range from opportunistic to downright criminal.
Lesson learned – rather than do a Google search for “Wells Fargo Bank” and then click the top hit, type in “wellsfargo.com” in your search bar at the top. That’ll bring you directly to the page you want. Better yet – make a bookmark out of those oft-visited pages, ensuring you’ll never hit a bogus page by accident.
How to handle the entire bookmark thing? Tune in here next month, same Mac time, same Mac channel!
January 1, 2024
The Writing on the Wall…
A question I’m often asked: “Should I get a new computer?”

Usually when I hear that, I know the user has read the writing on the wall and knows it’s time. But my response usually is “What makes you think you need a new one?” If I hear some specifics, it makes it easier for me to make a determination on the matter at hand. There are plenty of valid reason to want a new computer running out of storage is a big one. Modern Macs don’t give the end user (that’s you and me) the option to bump up the internal storage (a.k.a. hard drive) or RAM, for that matter. That’s another thing that was good about the old days, you could customize things once you got them home. But no more.
Another reason: You can’t access your bank unless you update Google Chrome. And then you find you can’t update Google Chrome because you need to upgrade your operating system (OS). And then you discover you’re at the end of line, because you can’t upgrade your OS because your hardware is too old. A real house of cards conundrum. Or maybe simply isn’t zippy enough with the kind of work you do on it, or it doesn’t have the bells or whistles you want. Or perhaps you have a desktop model, and you want a laptop (or vice versa). Or a larger display.
OK, so you’ve decided that a new computer will solve your issues. A few things to consider when deciding on a new computer:
Software compatibility: The version of software you’re using may not work on a newer OS. Things like QuickBooks, FileMaker Pro, pre-Office 365 Microsoft, and others may require an upgrade if you buy a new computer. And trust me, these aren’t usually free upgrades.
Storage: As mentioned earlier, you get what you pay for when it comes to internal storage, so plan accordingly. My rule for internal storage is the same for renting a dumpster – decide what size you need, and then get the next largest one. You won’t be sorry.
Adapters: Newer Macs have USB-C ports, which require a USB to USB-C adapter if you plan on using any of your USB peripherals. (Don’t worry, these adapters are inexpensive, particularly if you avoid the Apple-branded models and go third party.)
Setup cost: If you have a Time Machine backup of your old Mac, best bet (in most circumstances) is to avoid a straight “restore” and go with a “clean install,” which is reinstalling your applications and bring your data from the backup manually. Sounds more complex than it really is, but it’s the best way. Of course, this is more time and money, but doing that way is the correct way to do it.
To recap, here are some of the major reasons to consider ditching your current Mac:
- Overall slowness.
- Inability to connect to certain websites.
- Incompatible with the latest versions of software.
- Not enough internal storage.
Whatever the reason, I offer this piece of advice: It’s like deciding to buy a new car – when it’s time, you know it’s time.
November 30, 2023
Do You REALLY Have to Upgrade Your OS When Asked?

It happens to all of us; you’re minding your own business, when suddenly you get hectored by your computer that you need to update your operating system (OS). The question that begs to be asked – should I do it? It IS free, after all! There should be a simple answer, right?
Well, not really. As annoying people say on their social media profiles about their relationship, “it’s complicated!” That’s because there are TWO types of updates that prompt you to install them – the OS version and the incremental upgrades within the OS version.
OK, I’m sure I lost a lot of you there, but keep reading, it does get better! The OS VERSION is name and number of the operating system. The current OS version is named Sonoma, which is the 14th version of the macOS. There have been a few incremental updates released for Sonoma, which is why the current OS available is 14.1.1.
So why does Apple insist on releasing newer and newer operating systems? Mostly due to security updates and new features. Sure, many of the features are “behind the scenes,” things that help make your computer more functional and/or efficient, but you never know they’re doing their thing.
So, Apple goes ahead (with great fanfare) to release a new version of its OS, chock full of new features and stuff, which generally happens annually. In between releases, of course, there are the incremental updates. These are usually minor, mostly fixing bugs and patching up security flaws that are discovered once the software is out there.
But – back to our original question: Do I always have to update when a new OS version is released?
Depends. (How’s that for a non-answer?) There are a bunch of items you have to consider. These include (in no particular order):
- Is my computer new enough to handle the latest OS? The good news is that it won’t allow you to start installation if your hardware isn’t new enough.
- Am I running any software that might not be compatible with the new OS? This is all third-party software we’re talking about – not the software that comes preloaded on the Mac. Programs like QuickBooks, FileMaker, and all sorts of high-end audio and video software have had issues here in the past. If you’re using anything that isn’t the standard Zoom, Google Chrome, or Microsoft Office, you will want to do your homework to make sure your software is compatible with the latest OS. Some programs might need a free update, while others might require a paid upgrade to a new version.
- Do I have enough space on my hard drive? Most installers take up a few gigabytes of space, so if things are getting tight in the storage department, then best to hold off until you tidy things up in there.
- And finally, do I really need it? It might not be necessary. If things aren’t broken, don’t break them. Keep on running it until you have to upgrade.
As far as incremental updates go (known as “patches” in the Windows world), it’s best to install them when they arrive. They usually do very little in the area of functionality, mostly they’re used for is to repair security issues have been discovered in the OS since it’s been public.
November 1, 2023
Is Your Computer Protected From a Virus?

The notion that “Macs don’t get viruses” is something that has been around for years. And although that’s not entirely true (spoiler alert – they can!), in most instances, it’s the boring computers that need to concern themselves with that sort of nonsense – brands that run Windows, such as Acer, Lenovo, and Dell, among others.
And while Mac users are way cooler than their Windows-suffering counterparts, they still should know that there ARE viruses and malware that infect the Mac OS, even though they’re not as prevalent as those that taint Windows machines.
OK, the truth is that there ARE bad things that can infect Macs. A lot of the time, these are delivered by visiting non-mainstream websites, such as hardcore gaming sites and porn pages. But in other instances, a link from an email can infect your computer. Sometimes it’s just a malicious browser extension, other times it can be something far more serious.
How can you avoid this sort of trouble?
Start out by being a bit more careful on the places you visit – stay off bad sites, don’t click on any links that look suspect, and certainly avoid browser extensions that offer benefits – savings, rebates, etc. And most importantly, install a good anti-virus software, such as Malwarebytes. There are plenty to choose from – Norton, McAfee, and Sophos (among many others), but, unlike most others, Malwarebytes, while a subscription product, also offers a free version. Sure, that means you must manually scan your computer for bad stuff, but if you’re vigilant during your time online, chances are you have little to worry about.
September 30, 2023
Is Your Data Being Synced Between All Your Different Devices?

One of the great advantages of using Apple products is the ability to seamlessly sync your data between devices (your Mac and your iPhone, say). Yet, I still get calls about how calendar entries on the Mac won’t update on the iPhone (or vice-versa), or that the number of contacts on one device doesn’t jive up with the other. Or changes made here don’t show up there. Or entire blocks of contacts are missing somewhere.
There are really only two serious players in this field – Gmail (Google) and iCloud (Apple). Understand that it’s a Coke/Pepsi, Mustang/Camaro, Beatles/Stones, Mary Ann/Ginger type of thing – people are generally more inclined to go with one over the other almost every time. So, for the sake of brevity, I’m sticking with these two here, although going with other providers is similar to enabling Google on your devices.
Let’s start with calendars: First of all, you have to understand the difference between SERVICE and SOFTWARE. As far as calendars are concerned, the ability of your appointments to be synced on multiple devices is a SERVICE. What you see on your computer or phone (most commonly, Apple’s Calendar app) is SOFTWARE. Think of this as an old-school way: A hardcopy calendar is analogous to the SOFTWARE; the physical writing of appointments on said calendar is the SERVICE.
OK, let’s take Apple Calendar app. (That’s the software.) Without any data in it, all it does is tell you what day it is. So, all you need to do is add the service.
But what is the service that syncs your calendar items?
OK, it’s (almost always) connected to some sort of email account. That could be Gmail (Google), iCloud (Apple), or any number of lesser providers. (I find Google and Apple to be the best options here.) If you’re using iCloud, it’s an easy setup. Pull down on the apple (upper left corner of the screen) and select SYSTEM SETTINGS. (Or SYSTEM PREFERNCES if you’re running a pre-Ventura operating system.) Click on your name at the top of the list, then on ICLOUD in the list. Under APPS USING ICLOUD, click on SHOW ALL (if Calendar isn’t visible in the list) and confirm it’s enabled. Similarly, on your iPhone (or iPad), tap SETTINGS and then your name at the top of the list. Tap ICLOUD in the list below, and SHOW ALL (if Calendar isn’t visible in the list) and confirm it’s enabled.
As far as Gmail is concerned, open the CALENDAR application on your computer, select SETTINGS (or PREFERNCES) under the Calendar menu (upper left corner of the screen, to the right of the apple) and then the ACCOUNTS tab. There, you can enter your Gmail account credentials and tick off ENABLE THIS ACCOUNT. On your iPhone (or iPad), under SETTINGS, scroll down to CALENDAR and tap ACCOUNTS. Here, you’re able to enter your Gmail credentials and have your calendar appear on your iPhone.
As far as contacts go, follow the same steps as above, except substitute CONTACTS in both instances for CALENDARS. Then, all should nicely sync!
August 31, 2023
Understanding Storage Warnings

Data. Files. Stuff. Whatever you want to call it, it takes up space. Whether it’s space on a physical item you own (iPhone, computer) or some random place way out there (on the cloud), it’s being stored somewhere. Perhaps in more than one place, but that’s a story for another time. Normally, storage is one of those things, like kidney function, that you don’t even notice it’s working until there’s an issue.
But when there is an problem, you’ll get some kind of warning. A pop-up warning of some sort that is alarming, because it snaps you out of your reverie. In today’s complex tech universe, where you have plenty of things that warn you that something’s wrong, understanding what the warning refers to is paramount, as well as knowing what to do about it (besides panic).
So where does your stuff reside, and when does it warn you that you’re running out of storage?
Your Computer
Your computer comes with a finite amount of physical storage, which is generally referred to as “the hard drive,” although that term is going the way of “rewind” (for going back), “dialing” (for making a phone call), or “icebox,” (what ancient humans called refrigerators).
But back to today!
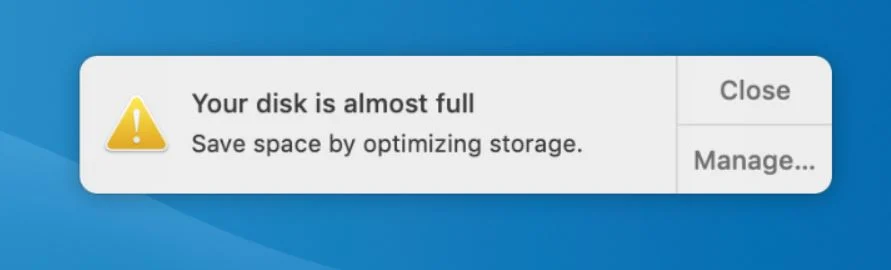
Every computer (at least those that matter) have some type of internal storage, whether it’s an old-school hard drive (with those spinning disks), an SSD (solid state drive) or flash memory devices. Your operating system (OS) and applications take up some of the room; your files, which could be email, photos, music, or any number of other things, take up the rest. On the Mac platform, if you approach capacity, you’ll get a warning.
Need to learn what to trash when you get the warning? Read my award-winning piece on that subject here!
Your iPhone (and iPad)
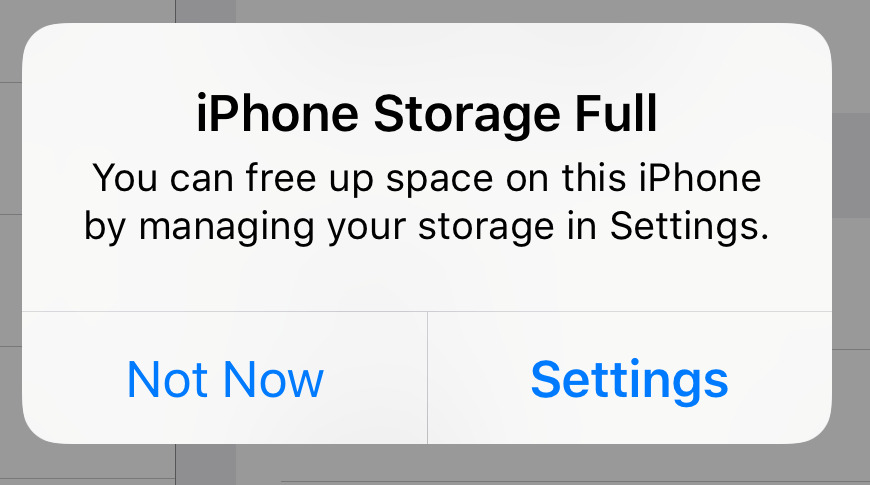
Like your computer, your iPhone also has a finite amount of space. Unfortunately, once you buy your iPhone, you’re stuck with that capacity, with no option to upgrade (short of buying a more expensive iPhone). Again, your iPhone’s capacity is taken up by the operating system (iOS), the apps installed (and their associated data) and any other stuff you may have stored on there. Understand that email, photos, music, podcasts, and even text messages can take up huge amounts of space.
Where can you learn about iPhone storage? From me, of course! Right here!
Your iCloud Account
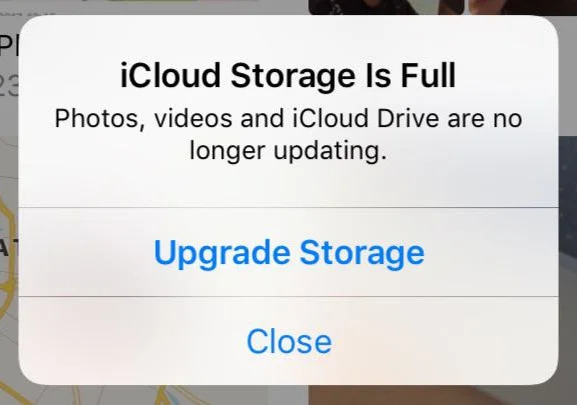
If you own an Apple device, you’re most likely hooked into iCloud. Why? Because Tim Cook & Co. make it hard not to be. Now, there’s a free version, where Apple gives you a Scrooge-like 5GB of storage (which is analogous to giving somebody a $25 gift certificate to Nordstrom) for free, and of course there are options for purchasing more space, up to 2 TB.
First of all, what exactly is iCloud?
Simply put, it’s best to think about it this way: iCloud is a service. It’s a service that allows you to sync and backup any number of items: Contacts, calendars, photos, data, and more. What you choose to back up is up to you – but understand backing up large photo libraries to all of your devices takes up space somewhere on a computer somewhere else in the world – a computer that’s not yours (and hopefully very secure).
Want more info on this? Check out my blog post here!
Your Mail Provider
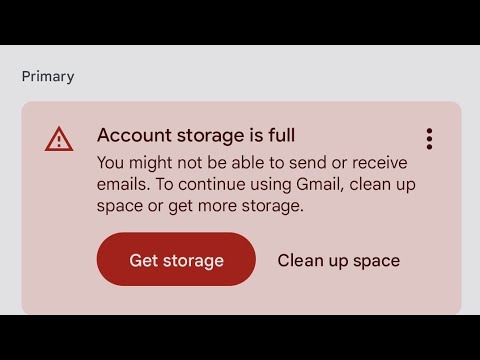
In addition to those areas listed above, your email provider also has storage limitations to how much you can store. While how much space you’re allowed depends on your plan with your email provider, but the “free” services have different limitations – Optimum doles out a miserly 5 GB to its clients, while Google (Gmail) triples that with its free email.* AOL gives you 1000 GB gratis (I checked online, but don’t use AOL), but its mail service stinks, so you’re better off with a more sophisticated provider. Best practice: Clean out your inbox regularly AND empty your email’s trash.
Need help on this task? Check out my post here!
*Gmail allows you to buy more storage; Optimum does not.
August 1, 2023
Fear and Loathing on the Web
Here we go again – another long hot summer, another bunch of degenerates trying to tap in your fear emotion and get hold of your info, your logins, your bank account, which makes you loathe going online.
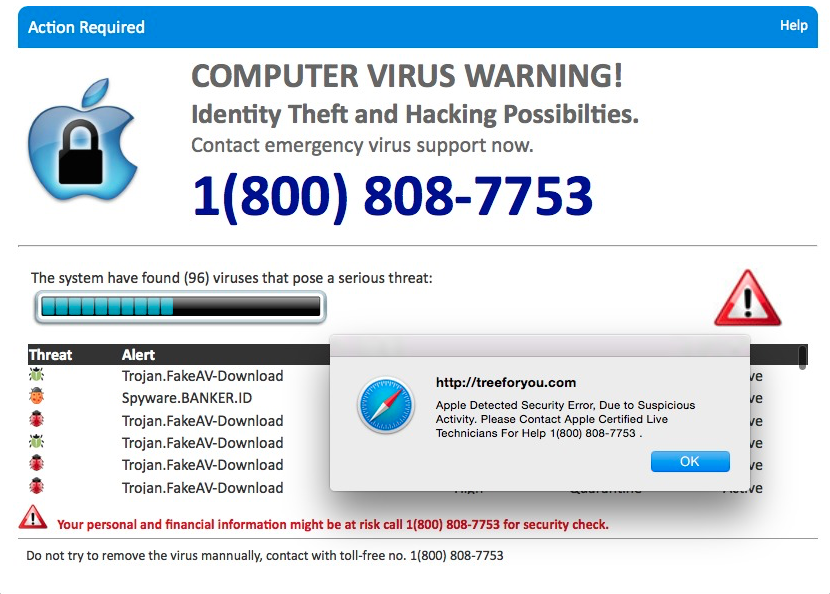
Yup, along with fall, winter, and spring, ‘tis the season to get all sorts of wonky emails, texts, popups, and phone calls from low-life criminals from all corners of the globe. These scumbags play on your emotions, warning you of all the horrible things that could happen if you don’t call them ASAP; install malware, steal your identity, ruing your credit, blackmail you, etc. This horrible popup occurred solely because somebody searched for “amazon.com” instead of entering it into the URL bar on the top of their browser, and then clicked on one of the links that showed up as a search result.
Sometimes these scams install adware, things that “pop up” on your screen, while other are more insidious. For example, the graphic above was triggered by an evil link – a booby trap that somebody set up in order to try to scam the user. The idea is to play on the emotions of the stressed-out user, who get worried about losing data, etc. In other instances, these evil links direct you to site purposed to be a legit company (Amazon, Microsoft, etc.) but is actually a scammer looking to gain something. And that something is going to cost you!
But what to do?
First of all, no legitimate site is going to tell you about a virus and paint you a dire picture of your future. Simply quit the browser you’re working in (Safari, Google Chrome, Firefox, etc.) and breathe a sigh of relief. Launch your browser again, and hopefully that’s the end of the story. You should always clear your browsing history after an episode like this, and in the unlikely event that your startup page is the last page you visited, you’ll have to change those settings, but don’t concern yourself with that until you’re there.
June 30, 2023
Beware the Facebook Addiction!

Ahh, Facebook. Whether you love it or loathe it, it’s an undeniable part of society today, and despite a lot of eyeballs going elsewhere (I’m talking to YOU, TikTok!), it’s not going anywhere. (See its latest stock price here.)
But – like many other things in life, there is a chance to overdo things on Facebook. Sure, we love our furry friends (of the moment) or silly memes, but probably most of all, we all relish the chance to interact with others. And unfortunately, some of this interaction can be beneficial. For somebody else. And harmful to you.

Take a quick look at these those posts; Everybody wants to help a poor, lost dog or recall the good old days when seatbelts were optional, kids roamed free range through the neighborhood, and the words “bike” and “helmet” were never included in the same conversation.
OK, so you’re asking: “How can interacting with these seemingly innocent posts be an issue?”
Good question. (Not a great question, however; if somebody ever answers with “that’s a great question!,” it means it isn’t.) Let’s start with the car post. Think back. Back to the early days of online access. Maybe even when AOL dialup with all the rage. You established your bank access online – and set up security questions. Like your dream job. What was your mother’s maiden name. Who was your favorite pet. Model of your first car. Oops. All info that can be used to hack some account of yours.

Sneakier yet is the “lost pet” post, and it’s cousin, the “crazy video” (tidal wave, tree falling, etc.) posted somewhere where it’s out of place – such as a Facebook Tag Sale page. The idea here is for many people to “like” it – and forward to others. In short, it’s a phishing ploy to glean some names for whatever comes next. Sometimes it’s to identify people who are marks for being taken advantage of; in other instances, once the post reaches a large number of people, it’s edited into something else, which may be harmful to the reputation of those who commented and/or shared it, or for some other unsavory purpose. I’m not sure exactly what the ultimate goal is here, but I don’t want to see the end of that movie.
The moral: Don’t interact with posts that aren’t from people in your friends list. Even posts that your friends answered. And don’t be a white knight warning it’s a not a legit post; that’s almost as bad as posting a legitimate comment on it. Consider yourself notified…
June 5, 2023
Look For Changes Coming to the Way You Share Your Photos Between Devices!

Chances are you were enjoying a fine spring weekend, when a missive from Apple appeared in your inbox, notifying you about a change in the way your photos are going to be handled. Shudder…
But that’s not going to happen anytime soon (July 26, actually, so you have plenty of time!) – it looks like the players (Google, Apple, Amazon Prime Photos, etc.) are dumbing down offerings, streamlining things, taking away features. Understand that stuff like this happens from time to time, across multiple platforms – from Apple’s migration from iPhoto to Photos, Costco’s decision earlier this year to shutter its photo center, the retirement of Picasa, etc.
What is “My Photo Stream?”
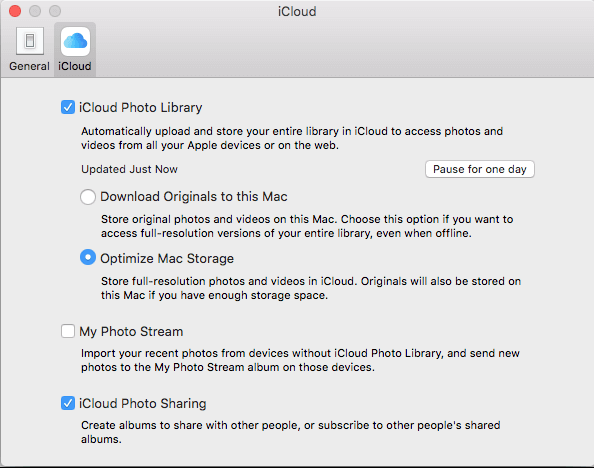
Once users started taking pictures with iPhones, they wanted to put their pictures on their computers easily. Apple listened, iCloud Photos allowed your devices to sync photos (along with other data) automatically, without having to connect them physically. My Photo Stream was a quick and dirty way to stream your most recent bunch (the last 30, up to 1000) of pictures from between your devices.
So, your first order of business is to see if you’re even using iCloud Photos. So, let’s start on your Mac. Open SYSTEM SETTINGS (or SYSTEM PREFERENCES, if you’re not running Ventura) and select iCloud. There, you’ll see a few options – you’re looking for Photos. Disable (by unchecking) MY PHOTO STREAM. Similarly, on your iPhone, go to SETTINGS>ICLOUD and disable the feature there.
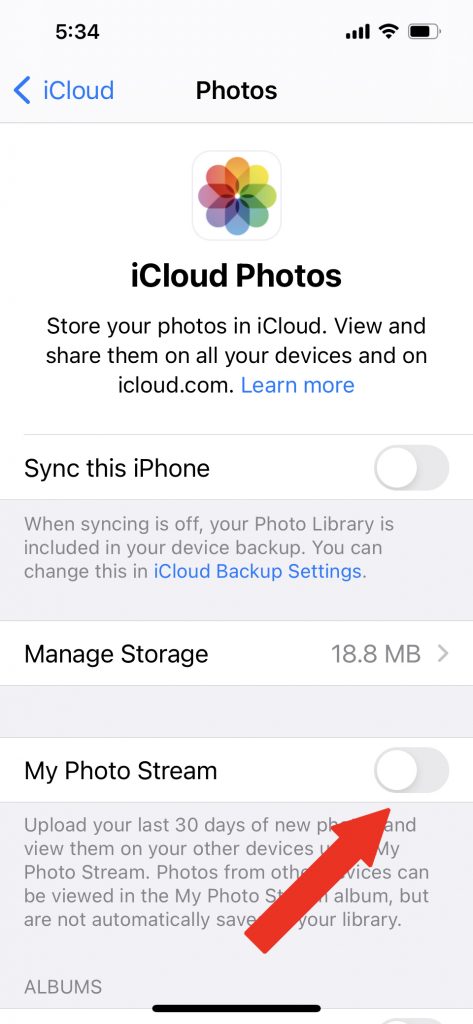
Bottom line: You won’t lose any pictures – you’re merely disabling a soon-to-be-obsolete feature in your Apple photo storage service.
May 2, 2023
Maintaining Control of Your Logins
I’m sure you’ve noticed that your email address is more than just your email address.
Case in point: It’s also used as your login name for virtually every site you visit – Amazon, Facebook, your bank… Almost every site. And if you happen to use a site that requires a username that’s not an email address, you have to supply your email address to verify your identity or (hopefully not) reset your password in the event you lose or forget it.
But – what if you no longer have access to that email account? Suppose you lose your password, and the reset link is being sent to an address that you don’t have the password for, or maybe an email account that no longer exists. How do you handle that?
So, first things first. Check out at the email address that you use as a login for these sites. Is it a common one, Gmail for example? Or is it your “work” email address, a company that you work for? It’s no secret that one day you can have a job, the next day you don’t. And if you get fired or laid off, will you have access to that email address for very long? Doubtful, very doubtful. Or if you quit your job, will you be able to receive mail there? Probably not. I’ve worked with real estate professionals who have given their notice, and trust me, before they’ve even driven out of the parking lot, their email account was already deleted. Permanently.
Therefore, look at your logins. Confirm they’re using an email address that YOU control, such as your own domain, Gmail, or any other reputable service. And avoid using an address from a company that provides you with internet, such as Optimum or Xfinity. One price hike and you’ll be scrambling to change your usernames. And of course, avoid AOL and any of the Yahoo-associated domains (Yahoo, SNET, AT&T, etc.), not because they’re a problem with being used for logins, but because Yahoo is a lousy company, and its email products are subpar.
Now, your homework is to check your logins. If you’re using an email address that could be rendered useless tomorrow, it’s time to change it. Better do it when it’s easy – at a time when you can actually receive verification email messages to that account. And it wouldn’t be a bad idea to give yourself a “safety” email address – a free one – such as Gmail, iCloud, Proton Mail, or one of the other “good” providers out there who dole out free email addresses.